OAuth2
OIDC/OAuth 2.0 is the preferred way to authenticate against Jakamo.
1. Overview
OAuth 2.0 is the industry-standard protocol for authorization. Jakamo supports authorization to APIs using the client credentials flow of OAuth 2.0.
The OAuth2 Client Credentials flow is a way for a client application to obtain access tokens from an OAuth2 authorization server - in this case, Entra ID - without involving a user.
- The client application sends a request to the authorization server and includes the client application id and client application secret as credentials.
- The authorization server verifies the credentials and, if they are valid, issues an access token to the client
- The client can then use the token to make requests to protected resources, in this case, Jakamo APIs
- The Jakamo API server verifies the access token signature and claims and, if they are valid, allows access to the resources
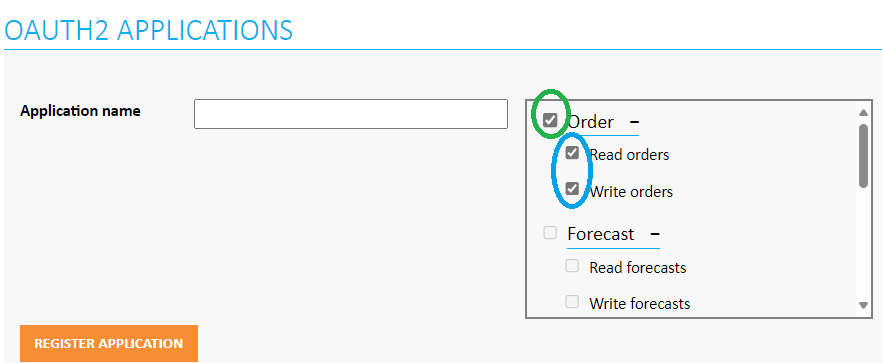
The OAuth2 application registration currently only supports one permission category (or integration) per application. The permissions cannot be changed after the application has been registered, so if you need to access multiple resources, you will need to create multiple applications.
This means that if you have a PO integration, you need to give the application Read orders and Write orders permissions. If you later need to access the claims integration, you will need to create a new application with the Read claims and Write claims permissions.
2. Steps to enable OAuth2 authorization
-
Log in to Jakamo as a user with Company Admin privileges
-
From the upper left menu, select
Integrations -
From the Integrations page, select
OAuth2 Applications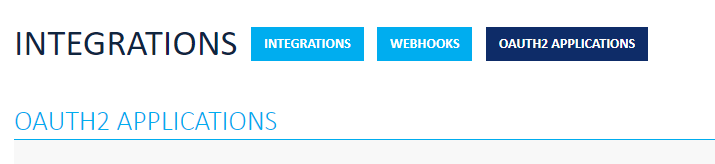
-
In the OAuth2 applications -page, enter a name for your application. Select the permissions you want your application to have. Click
Register Application.
- Usually both read AND write permissions are needed. Both can be chosen by checking the tick-box in front of the App in question.
- You can't change the permissions later. If you need to modify the permissions, you must create a new application.
-
Once the application has been registered, you will be provided with the
Client IDandClient Secret. You MUST note down the client secret, this is the only time it will ever be visible in plain text. If you misplace the client's secret, you will have to create a new application registration.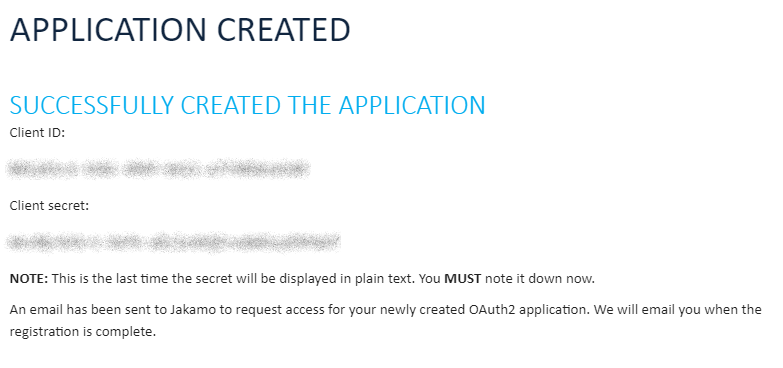
-
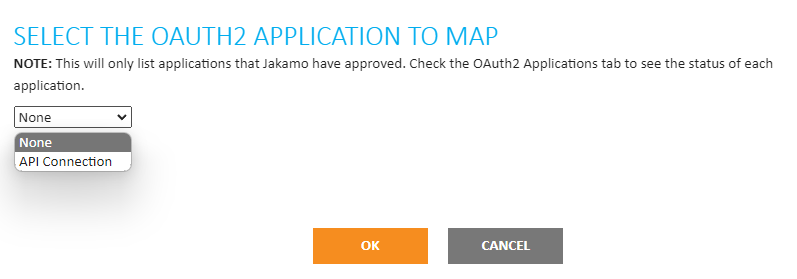
Once the registration is complete you can return to the
Integrationspage, and you will see aMap OAuth2 Applicationbutton on your integrations.
-
When you click the button a dialog window appears that allows you to choose an OAuth2 application to map to your integration. NOTE: Your newly created application will only appear when Jakamo administrators have permitted your application. The person who registered the application will receive an email when the application is approved. After the administrators have approved your applications it will take a few (5-10) minutes before the application is operational.
-
Once the application is mapped, you can change or remove the mappings by clicking on the
Changebutton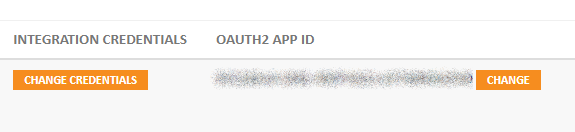
That completes the Jakamo side steps to register the OAuth2 application.
-
Ensure that the option for basic authentication has been prevented!
After you have succesfully tested OAuth2 athentication, please contact Jakamo support to ensure basic authentication is prevented and cannot be used as authentication method towards Jakamo. Jakamo administrators will disable basic authentication if it is not already disabled.
With new implementations, basic authentication is prevented by default, but if you are transitioning from basic authentication to OAuth2, it needs to be restricted separately. Without this check, basic authentication may remain as an option for authentication and can be considered an information security risk.
3. Testing using Postman
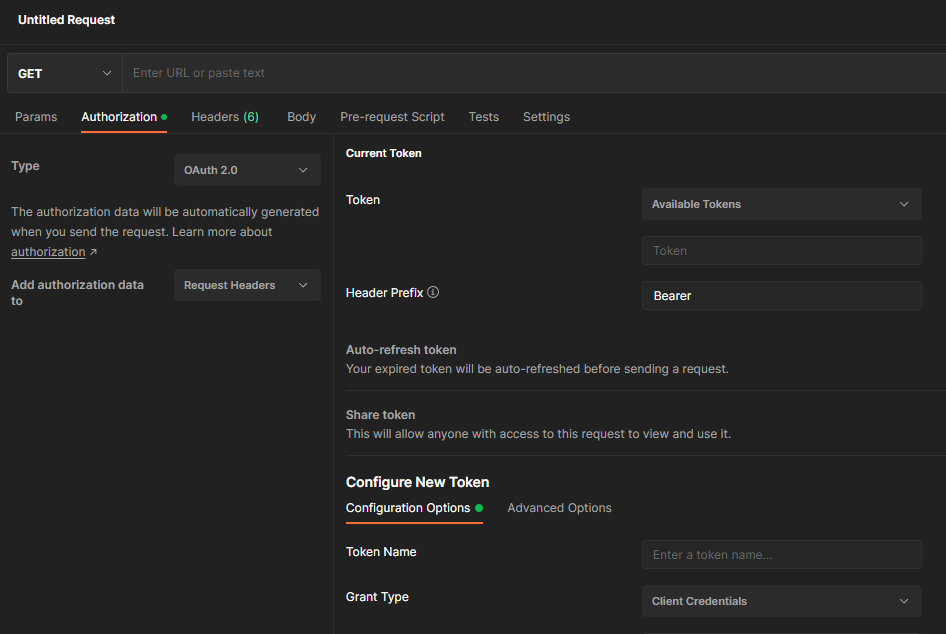
Armed with the client id and client secret from earlier, open up Postman. Open a new request and click the Authorization tab. For Type select OAuth 2.0. For Add authorization data to select Request Headers. Scroll down a bit until you see Configure new token.
Fill in the following information:
| Field | Value |
|---|---|
| Token name | Enter a name that lets you identify the token, such as Jakamo API token |
| Grant type | Client credentials |
| Access token URL | Enter the access token URL from the table in section 5. |
| Client ID | The Client ID you copied |
| Client Secret | The Client Secret you copied |
| Scope | Enter the scope URI from the table in section 5. |
| Client Authentication | Send client credentials in the body |
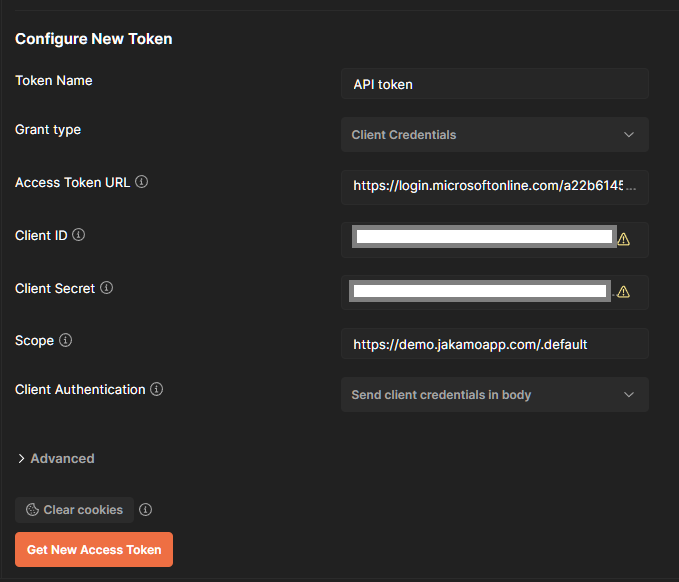
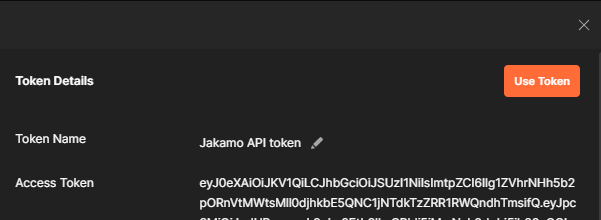
Then click "Get New Access Token" and if the application is approved, you will see a window indicating that Postman successfully received a token.
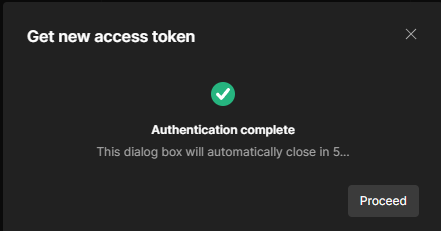
Once the window closes, you will be presented with a new window that has the token and information about it. When you click "Use token", Postman will use the token the next time you do a request.
4. Samples
4.1 C# sample
using System.Net.Http.Headers;
using Microsoft.Identity.Client;

var clientId = "{client_id}";
var tenantId = "{tenant_id}";
var clientSecret = "{client_secret}";

var confidentialClientApplication = ConfidentialClientApplicationBuilder
    .Create(clientId)
    .WithTenantId(tenantId)
    .WithClientSecret(clientSecret)
    .Build();

var scopes = new[] { "https://demo.jakamoapp.com/.default" };

var authResult = await confidentialClientApplication.AcquireTokenForClient(scopes).ExecuteAsync();

var accessToken = authResult.AccessToken;

var httpClient = new HttpClient();
httpClient.DefaultRequestHeaders.Authorization = new AuthenticationHeaderValue("Bearer", accessToken);

var response = await httpClient.GetAsync("https://demo.thejakamo.com/api/order/response");
var responseContent = await response.Content.ReadAsStringAsync();
Console.WriteLine(responseContent);
4.2 Java sample
package com.example;

import java.net.URI;
import java.net.http.HttpClient;
import java.net.http.HttpResponse;
import java.net.http.HttpRequest;
import java.util.Collections;
import java.util.Set;
import com.microsoft.aad.msal4j.*;

public final class App {
    public static void main(String[] args) {
        String clientId = "{client_id}";
        String clientSecret = "{client_secret}";

        try {
            ConfidentialClientApplication app = ConfidentialClientApplication
                .builder(clientId, ClientCredentialFactory.createFromSecret(clientSecret))
                .authority("https://login.microsoftonline.com/<tenant_id>/")
                .build();
            Set<String> scopes = Collections.singleton("https://demo.jakamoapp.com/.default");
            ClientCredentialParameters parameters = ClientCredentialParameters
                .builder(scopes)
                .build();
            IAuthenticationResult result = app.acquireToken(parameters).join();
            String accessToken = result.accessToken();
            HttpClient httpClient = HttpClient.newHttpClient();
            HttpRequest getRequest = HttpRequest.newBuilder()
                    .uri(URI.create("https://demo.thejakamo.com/api/order/response"))
                    .header("Authorization", "Bearer " + accessToken)
                    .build();
            HttpResponse<String> response = httpClient.send(getRequest, HttpResponse.BodyHandlers.ofString());
            String responseContent = response.body();
            System.out.println(responseContent);

        } catch (Exception e) {
            e.printStackTrace();
        }

    }
}
4.3 Node.JS sample
// Replace these values from the values of you app
const CLIENT_ID = '{client_id}';
const APP_SECERET = '{client_secret}';
const TOKEN_ENDPOINT ='https://login.microsoftonline.com/<tenant_id>/oauth2/v2.0/token';
const SCOPE = 'https://demo.jakamoapp.com/.default';

const axios = require('axios');
const qs = require('qs');

const postData = {
  client_id: CLIENT_ID,
  scope: SCOPE,
  client_secret: APP_SECERET,
  grant_type: 'client_credentials'
};

axios.defaults.headers.post['Content-Type'] =
  'application/x-www-form-urlencoded';

let token = '';

try {
    axios
    .post(TOKEN_ENDPOINT, qs.stringify(postData))
    .then(response => {
      token = response.data.access_token;
      axios.get("{url}/order/response", {
          headers: {
              Authorization: `Bearer ${token}`
          }
      }).then(getResponse => {
          console.log(getResponse.data);
      }).catch(error => {
        console.log(error);
      });
    })
    .catch(error => {
      console.log(error);
    });
} catch (error) {
    console.log(error);
}
4.4 Python sample
from msal import ConfidentialClientApplication
import requests

tenant_id = "tenant_id"
client_id = "client_id"
client_secret = "client_secret"
authority = f"https://login.microsoftonline.com/{tenant_id}"
scope = ["https://demo.jakamoapp.com/.default"]

app = ConfidentialClientApplication(
    client_id,
    authority=authority,
    client_credential=client_secret
)

token_response = app.acquire_token_for_client(scopes=scope)

access_token = token_response.get("access_token", "")

api_url = "https://demo.thejakamo.com/api/order/response"
headers = {"Authorization": f"Bearer {access_token}"}
response = requests.get(api_url, headers=headers)
print(response.text)
4.5 Go sample
package main

import (
	"context"
	"fmt"
	"net/http"

	"github.com/AzureAD/microsoft-authentication-library-for-go/apps/confidential"
)

func main() {
	// confidential clients have a credential, such as a secret or a certificate
	cred, err := confidential.NewCredFromSecret("client_secret")
	if err != nil {
		fmt.Println(err)
	}
	confidentialClient, err := confidential.New("https://login.microsoftonline.com/a22b6145-4c73-4914-901d-6bf96bcb0183", "client_id", cred)

	if err != nil {
		fmt.Println(err)
	}
	scopes := []string{"https://demo.jakamoapp.com/.default"}
	result, err := confidentialClient.AcquireTokenSilent(context.TODO(), scopes)
	if err != nil {
		// cache miss, authenticate with another AcquireToken... method
		result, err = confidentialClient.AcquireTokenByCredential(context.TODO(), scopes)
		if err != nil {
			fmt.Println(err)
		}
	}
	accessToken := result.AccessToken

	client := &http.Client{}
	req, _ := http.NewRequest("GET", "https://demo.thejakamo.com/api/order/response", nil)
	req.Header.Set("Authorization", "Bearer "+accessToken)
	req.Header.Set("Content-Type", "text/xml")

	res, _ := client.Do(req)

	fmt.Println(res)
}
5. URIs
5.1 Demo
| Type | Value |
|---|---|
| Access token URL | https://login.microsoftonline.com/a22b6145-4c73-4914-901d-6bf96bcb0183/oauth2/v2.0/token |
| Scope | https://demo.jakamoapp.com/.default |
| Tenant Id | a22b6145-4c73-4914-901d-6bf96bcb0183 |
5.2 Production
| Type | Value |
|---|---|
| Access token URL | https://login.microsoftonline.com/c87ad7a3-cc9b-4a04-be72-916199870e5c/oauth2/v2.0/token |
| Scope | https://api.jakamoapp.com/.default |
| Tenant Id | c87ad7a3-cc9b-4a04-be72-916199870e5c |
Didn't you find what you were looking for? Send an email to Jakamo support (support@thejakamo.com) and we will help you.